The best online fitness resource you'll ever need. We filter out the BS to ensure you meet your health and fitness goals!
The best online fitness resource you'll ever need. We filter out the BS to ensure you meet your health and fitness goals!
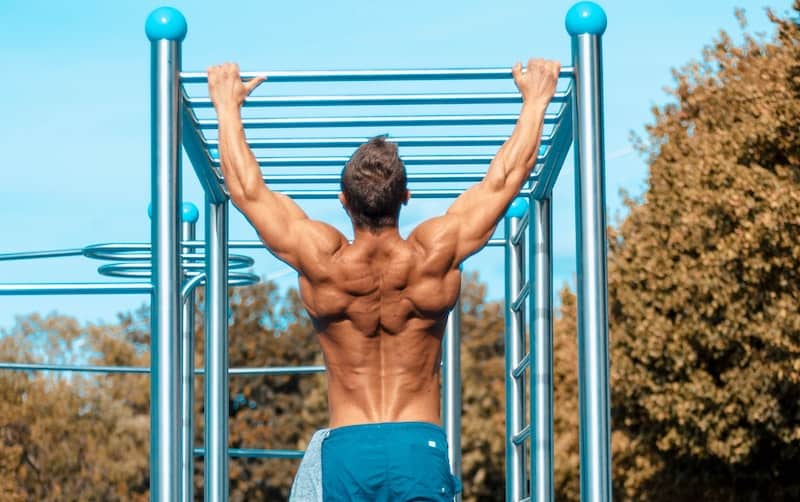
If you’re serious about building a bigger, stronger, more muscular back, pull ups are one of the proven ways to accomplish that. A compound movement, pull ups generally develop both the visible and deep support muscles of the upper back, with bonus benefits for the arm flexor and posterior shoulder muscles.
Along with the push up, being able to do a strict pull up signals strength and athleticism. Even if you don’t have them in your routine, it’s nice to know (and say) that you can do them.
A pull up requires that all its constituent muscles work together in harmony. Learning which muscles are involved and how to train them is important, whether your training goal is building the back, or simply to do more and better pull ups.
Thinking about the motion of the pull up helps identify the muscles that pull ups work.
From the starting position, the shoulder blades rotate down and in, the upper arms start moving down and slightly back, and elbows bend. The exercise finishes with the upper arms near the rib cage, elbows down, and shoulder blades pinched together.
Almost all the flexor muscles of the upper body get involved, and for sure, the bigger visible ones.
We’ve grouped all the muscles that pull ups work into 2 groups:
Try our: 1RM Weighted Pull Up Calculator
The lats are the large superficial muscle covering the middle to low back, and are the muscle almost everyone thinks of when thinking of back work. It’s the lats that contribute to the V shape from the shoulders to the waist, along with bone structure.
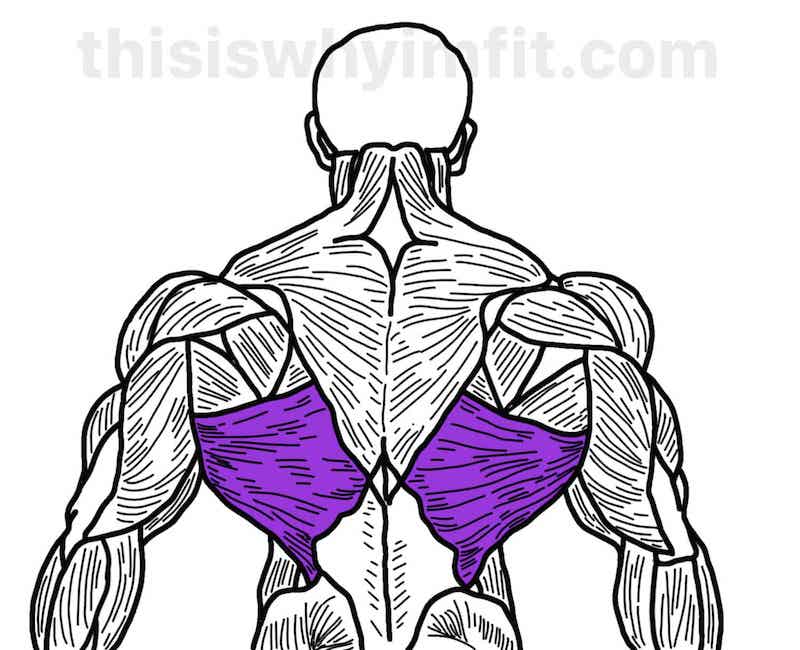
They cover more of the low back than many are aware.
Some of this misperception arises because the lats are frequently undertrained. Many of the exercises intended to address the lats don’t work them much at all, and instead work the external rotators of the shoulder or the arms.
It’s not uncommon to see people in the gym who work their backs constantly, who have well-developed posterior delts and teres majors, but who lack a broad V taper down to the waist.
Depending on genetics, the belly of some people’s lat muscles do not extend as far down the back as others. However, the area directly below the shoulder blade is capable of thick muscle, and many do not have this, simply because they do exercises that do not actually work the lats.
For the lats to be overloaded, they must pull the upper arm toward the rib cage in alignment with the fibers of the muscle. Pulling straight back–as many rowing motions do–does not directly load the lats nearly as much as pulling down and in.
The middle and lower traps compose a big percentage of the visible muscles of the upper back. When developed, they add thickness to the mid-back.
The trapezius muscles’ fibers offer clues to their roles.
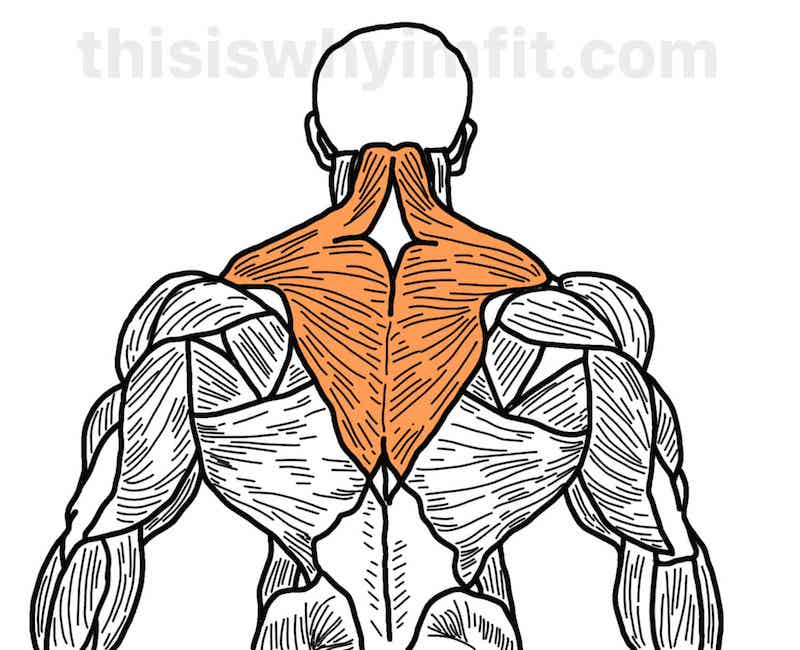
The fibers of the middle and lower traps run down and in toward the spine, suggesting (correctly) that movements that pull the shoulders back and down require those muscles to contract. Exercises that require the shoulder blades to pinch together work the mid and lower traps.
It’s helpful to observe that the traps do *not* attach to the arms. That’s important because there is no need for the arms to move to train the traps. If the elbows bend during a supposed trap motion, you can be sure that the traps are not being strictly worked.
During a pull up, the shoulder blades rotate up and out. The traps are among the muscles that must contract strongly to return the shoulder blades to starting position.
The teres major is a small posterior shoulder muscle that works in harmony with the lat. It’s sometimes called the “little lat” or the “lat’s little helper”. It contributes to rowing motions due to its anatomical orientation.
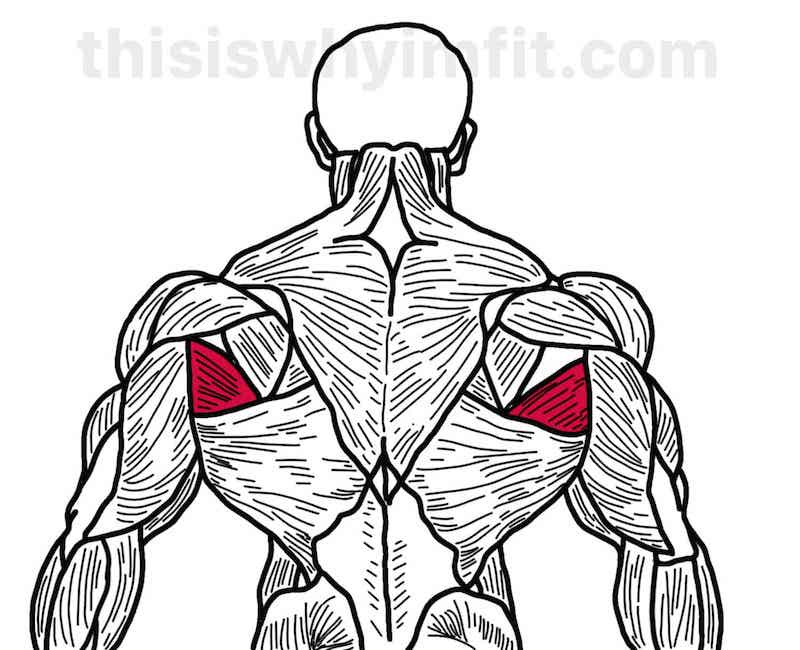
Where the lat pulls optimally more down and in, the teres major pulls a bit more backward. Its anatomical attachments explain why. It originates at the lower posterior border of the shoulder blade (scapula) and attaches to the anterior (front) surface of the humerus, which explains its line of force.
You can’t see the rhomboids, unless you’re a surgeon or attend an anatomy lab. The rhomboids lie underneath the trapezius muscles. They’re responsible for keeping the shoulder blades close to the rib cage and for moving them up and in toward the spine.
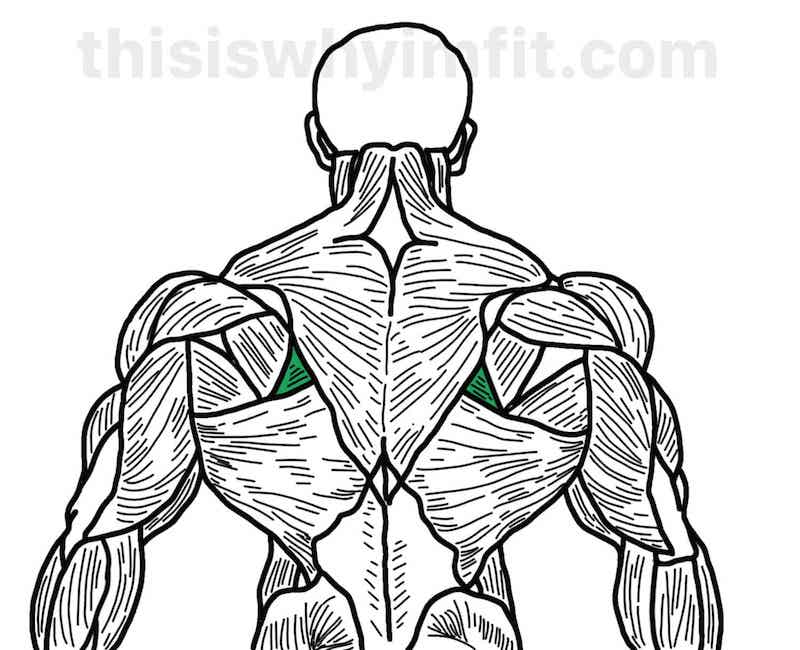
When the rhomboids are not well developed and incapable of holding the shoulder blades against the rib cage, the scapula sticks out, a condition known as “winging”.
The pull up requires that the scapulae rotate up and away from the spine and then back again to starting position behind the rib cage.
The rhomboids must relax to let the shoulder blades drift up and out, and then contract to bring them back again.
Strong rhomboids are required for a good pull up, and pull ups help strengthen the rhomboids. Again, you’ll never see them, but when they’re strong, they’ll help you develop the muscles you can see. Pull ups (and rows) work your rhomboids.
The posterior delts are responsible for bringing the upper arm back and down. They aren’t a primary mover during the pull up but do get involved.
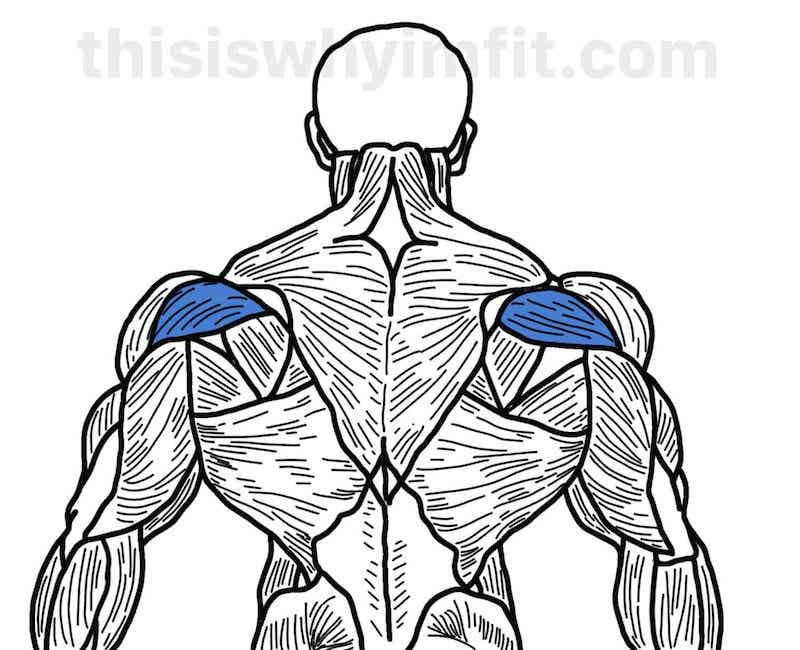
Pull ups wouldn’t be an exercise you’d do specifically to develop posterior delts. They do get involved, so it wouldn’t be unusual to get a nice pump in the posterior delts after a couple sets of pull ups.
The brachio-radialis, the brachialis, and muscles of the forearm get a lot of work during a pull up along with muscles of the upper back. The biceps also work but the pronated grip puts them at mechanical disadvantage. (Another reason why chin ups are preferred as an alternative biceps builder.)
Any time you bend your arm, these three muscles work to some degree. The arms potentially move a relatively heavy weight during pull ups.
Although pull ups aren’t considered an arm exercise per se, the arms have to bear a fair portion of the load.
How much the arms get involved during a pull up is up to you. Learning how to engage the back and reduce arm contribution–or vice versa–takes experience, knowledge, and concentration during the exercise.
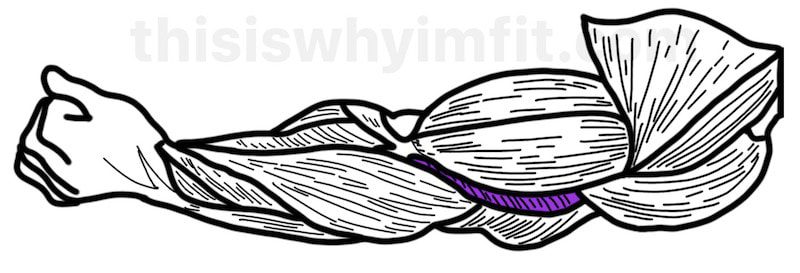
The brachialis is a primary arm flexor located underneath the biceps and beyond it near the elbow. When it’s developed, it beefs up the upper arm just above the elbow and adds height to the upper arm.
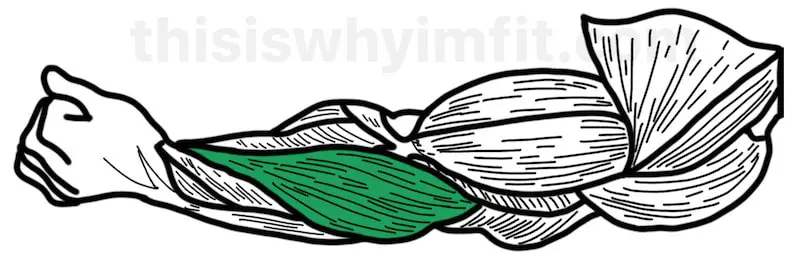
The brachioradialis is the muscle that adds width to the elbow and height to the forearm. It attaches on the radius, the forearm bone that’s on the thumb side of your hand, which means that anytime the thumb is “up”, the brachioradialis is going to be doing a larger percentage of the work than it would if the palms were up (and consequently, thumb pointed outward).
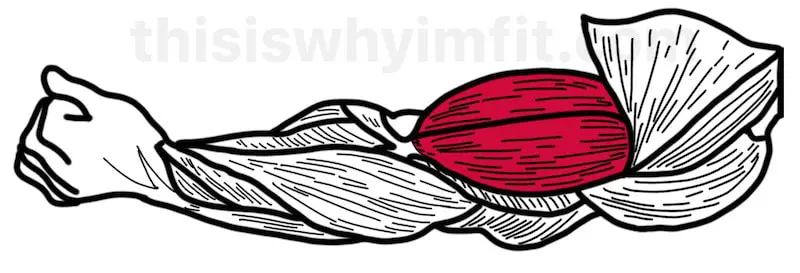
The biceps–both long and short heads–attach to the radius near the elbow. One of the biceps’ roles is to supinate, or rotate the palm of the hand upward. In that position, the biceps carries a greater percentage of the lifting burden than the brachioradialis.
That means that the chin up would be a better choice to involve the biceps than would the overhand pull up or hammer grip pull up.
The sum of the parts is greater than the whole.
Being a compound movement, the pull up does not isolate any single back or posterior shoulder muscle. It’s impossible to know exactly how much overload each one is receiving.
Several muscles must work in concert to perform a pull up. You can’t know exactly how much of the load each single muscle is bearing.
There could be a “weak link” in your pull up that’s holding you back (pun unintended), so it makes perfect sense to break it down and train each muscle individually as much as possible. Isolation exercises identify the weak links, and train them up.
Here are three back isolation exercises and one arm exercise to isolate and build the pull up’s primary movers. Working these individual muscles in isolation will lead to a better pull up.
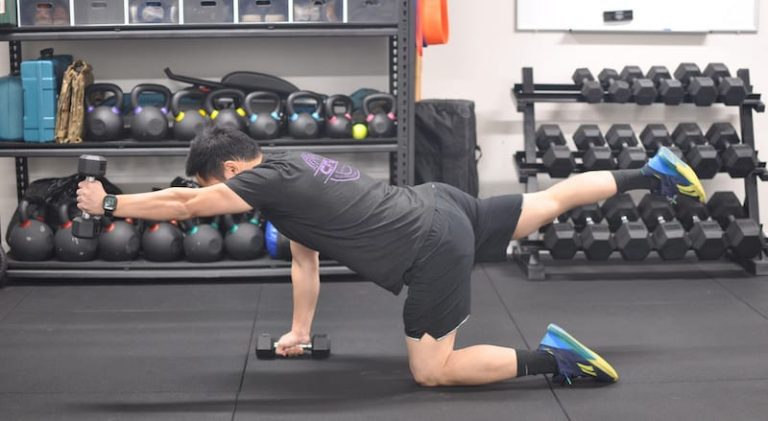
The lat pull in is the best isolation exercise for the lats. Biomechanically, there’s not a better way to take the other muscles out of the equation.
When you look at where the lats originate (along the spine) and insert (at the shoulder under the upper arm), and then follow the direction of the muscle fibers, it’s easy to see why lat pull ins work so well. Trace a line from the insertion back to the origin and you’ll see that pulling inward toward the side .
The lat pull in features pulling the weight not down, not back, not across the body, but inward from the 10 o’clock-2-o’clock arm position.
Here’s how to do a lat pull in:
We first learned about the lat pull in from Doug Brignole, AAU Mr. Universe. Doug is renowned for his scientific work defining specific exercises that most directly isolate and overload the target muscle without putting it at risk of injury.
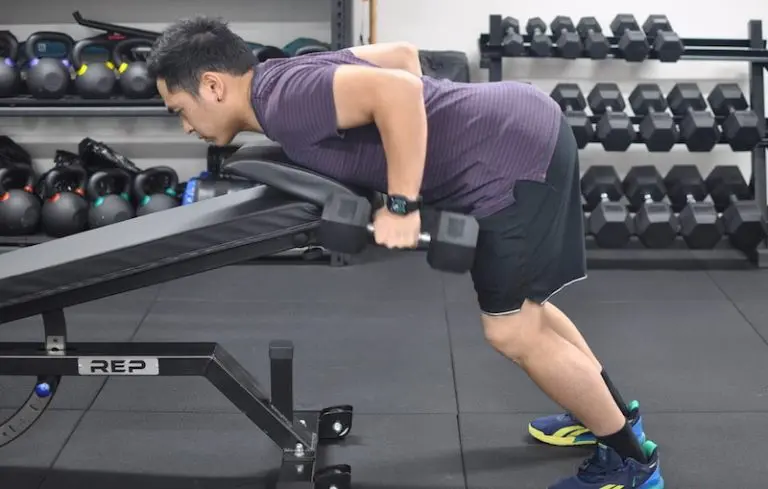
Horizontal Shrugs focus on the middle and lower traps. These are best done seated on an adjustable bench, using a dual pulley cable machine. You can also use a utility bench if an adjustable bench isn’t available.
To do a horizontal shrug:
If a dual pulley cable machine isn’t available, you can also do a modification using a wide bar and a seated cable row machine. The same instructions apply: keep the arms as straight as possible and pull the weight back using just the muscles of your middle back.
Aim to squeeze your shoulder blades as close together as you can. The range of motion is shorter than the seated row.
The middle and lower traps are specifically worked by pulling the scapulae together.
There are several prescribed ways to do a partial pull down. Here’s a version that isolates the middle and lower traps while training the first initial portion of the pull up.
Using a cable pull down machine with a lat bar:
A pull up relies on the arms along with the back. Strengthening the arm flexor muscles, especially the brachioradialis and brachialis, becomes important if doing more perfect pull ups is your objective.
There are 20 ways to do a hammer curl, so you’ve got lots of options. There are three we can suggest:
Regardless of which gym implement you pick, hammer curls are performed the same way:
Hammer curls somewhat preferentially load the brachioradialis more than traditional palms up grip curls do. This is because the brachioradialis – that muscle that adds height to the forearm and bulk around the elbow – is oriented more directly against resistance.
The biceps–responsible for forearm supination–turning the hand palm-side up–are less involved since the palm is neutral and facing inward toward the body during a hammer curl.
In general, pull ups are for back and chin ups are for arms.
The grip distinguishes a pull up from a chin up. Pull ups use an overhand grip (prontated) whereas chin ups use an underhand grip (supinated).
Pull ups require a wider grip simply because overhand grips require it. Chin ups allow for grips narrow enough for the heels of the hands to touch.
The biomechanics of pull ups and chin ups differ as well, although not much. The same muscles are used for both exercises. The underhand grip supinates the hand and creates a favorable position for arm concentration (the biceps are a strong supinator of the hand). Upper arms are used for the overhand pull up also but the pronated grip isn’t not as natural a position for arm work.
Do pull ups when you’re focusing on the entire upper back and forearm muscles.
The pull up grip pronates the hand. The biceps are a hand supinator, so pull ups put them at mechanical disadvantage. The brachioradialis–the powerful upper forearm muscle–is in position to help.
For starters, the same muscles get in on the action when hands are wide or close. It’s a matter of how much and which grip favors particular muscles in this compound exercise.
So when should you pick a wide or close grip?
A wider grip favors lat involvement. The elbows must pull more directly down and inward toward the torso. Too wide, and you limit the range of motion. Your elbows should ideally finish near your rib cage.
A narrow grip pull up preferentially works the posterior shoulder muscles because the shoulder must move into extension (i.e., the upper arm moves backward and not inward). It also forces the hands into greater pronation (thumbs rolling inward), working the forearm muscles almost like a reverse grip (palms down) curl would.
Beyond those considerations, comfort, preference, and equipment availability dictates your grip. You may not have pull up bars that are ideal and you’ll need to adapt.
If equipment doesn’t impose a constraint, pick the pull up grip that puts your arms out to your side so that the lats get intensely involved, yet not wide enough to severely limit your range of motion.
Anatomical Considerations
How wide is wide and how narrow is narrow is relative: it depends on the person. A wide grip for a person with short tyrannosaurus arms will be narrow for someone with long orangutan arms.
When to Choose Chin Ups
Do chin ups when you’d like to use a pulling motion to work your arms. In fact, once you’re skilled at the exercise, you should be able to “let go” of the back muscles, relaxing them, and make your arms do all the pulling.
The arms then are responsible for lifting your entire body weight (minus the arms’ weight of course).
You’ll need to take care and not invite overuse injury. Tendinosis of the elbow can result, as we can tell you from personal painful experience.
The same rules apply for wide and narrow grip chin ups as do for pull ups. The same muscles get the work. It’s really a matter of comfort and the chin up bars you’ve got available to you.
Optimum grip ranges are from the heels of the hands nearly touching in the middle, in front of your face at the top, out to shoulder width. Any narrower or wider puts the wrist in an awkward position for no good reason.
Exactly shoulder width apart is the sweet spot for chin ups.

The Neutral “Hammer” Grip Pull Up
Midway between a pull up and a chin up hangs the hammer grip pull up.
The hammer grip pull up requires a pull up bar with handles that enable a grip where the palms face each other (aka neutral grip).
The elbows must travel down, back, and near the rib cage during a hammer grip pull up. Although it’s not the ideal physiological position, the lats must strongly engage as must the external rotators of the shoulder. The visible ones most lifters care about are the posterior delts and the teres major.
As far as arm muscles are concerned, the hammer grip pull up is identical to the pull up because the thumb is in the same relationship to the forearm in both overhand and hammer grips.
What differentiates them is the position of the upper arm. Hammer grip pull ups require horizontal shoulder adduction, but nothing changes for the biceps, brachialis, and brachio-radialis.
Those muscles don’t “care” about the position of the upper arm. What matters to the arm muscles is the position of the thumb.
Choose hammer grip pull ups when you want a compound blend of pull ups and hammer curls. The neutral hammer grip orients the thumb and forearm so that the brachio-radialis works more than the biceps.
How much the arms get involved with any pull up depends on the person doing the exercise. Good mind-muscle connection allows the lifter to use more arm, or more back.
It’s a learned skill and takes practice and concentration. Beginners will struggle with this concept, as will people who have worked out for years and have simply gone through the motions.
Wide Vs. Narrow Hammer Grip Pull Ups
You can only go so wide with a hammer grip pull up and have it still be a hammer grip. At some point, your palms will begin to face forward and not face each other. Once the palms face forward, you’ve got a pull up.
Let ease of performance and your available equipment dictate the width of your hammer grip. Some gyms have an assortment of perpendicular hammer grip pull up attachments. Some, not so much.
To perform a perfect pull up, all you need is a bar overhead that allows you to get an overhand grip that’s wider than shoulder-width and proper pull up know-how.
Do this:
Pull ups are one of those gym staples that any serious gym goer should learn. Some gym goers are working toward perfecting their pull up. Others are simply hoping to do one someday.
Doing them routinely isn’t necessary, but being able to do them adds confidence and signals general fitness.
With obesity in epidemic numbers, doing just one pull up is out of reach for many. Pull ups are challenging even for people with healthy body compositions; doing that first pull up is a worthy goal for anyone.
Pull ups are a “self-limiting” exercise, meaning that–like push ups–moving your own bodyweight is a requirement. Simply stated, your body sets the starting limit. So if you can’t lift your own body’s weight, step one is working up to moving that amount.
Progressing into a pull up has two dimensions: learning the form and increasing the resistance as you go. You’ll need a gym with some basic equipment to do this on your own.
Otherwise, you’ll need a partner who is strong enough to spot you as much as necessary.
The progression we’re about to describe can be adapted to your strength and experience level. To do it, you’ll need a cable machine, a squat rack, and a pull up/dip machine.
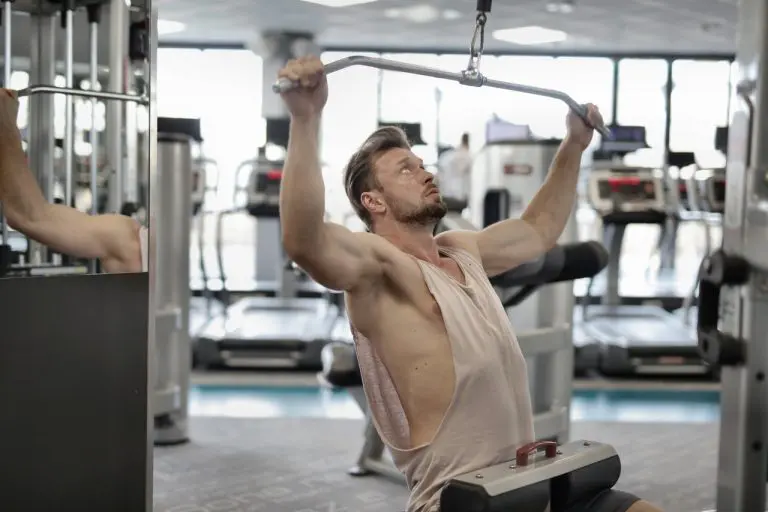
The overhead cable pull down allows proper pull up form to be practiced along with progressive overload from light weights almost anyone can lift.
You can use a lat pull down bar or a straight bar attachment…any long cable machine attachment that allows you to grip wider than shoulder width.
Select a weight that you can lift strictly for at least 20 repetitions without using momentum. No momentum means that your upper body needs to be completely stationary. No pulling back at the waist.
The pull down must be executed using the back muscles primarily and the arm muscles as synergists. Proper pull down form is a must because that translates to proper pull up form.
Once you’ve mastered the 15-20 rep range with ease. Work up in weight and down in reps until you’ve reached the 8 to 12 rep range.
Continue raising the weight until you’ve reached a load where you can’t reach 8 reps with good form. Work at or just below that weight until your form is solid for 8 to 12 reps, then raise the weight again.
You’re working for a target weight that’s near your body weight. Stating the obvious, once you can do a strict pull down that weighs as much as you do, you’re close to being able to do at least one pull up and probably more.
The Pull Up machine provides an elegant intermediate step in progressing toward a bodyweight pull up. Biomechanically, it differs little from a pull down, except that you’re pulling up toward the bar rather than vice versa.
It’s a subtle difference and one that’s as psychological as it is physiological. You get the feel of pulling yourself upward toward the bar.
There’s the added benefit of being completely unable to cheat and use momentum. Knees rest on the pads and the only way to move is by using the back and arm muscles. Use this machine to practice using your back instead of your arms for the pull.
Same progressive overload strategy applies as described above for pull downs.
For this phase in our pull up progression, you’ll need a power rack with a pull up bar attachment (or a bar across the top) and a selection of resistance bands. Which bands you use depends on how much support you need at this point.
Set the bar supports at a height that matches where your knees would be midway through a pull up. You’ll need to experiment with this to find the right height.
Slip each bar supports through the band so that the band is stretched across the middle of the rack.
Now, climb into the rack, grip the pull up bar and rest your knees on the band.
The band won’t be stiff enough to support your weight, so you’ll be partially on your own…and close to doing a bodyweight pull up.
Same progressive overload applies. Warm up then work into the 8 to 12 rep range, reducing the band stiffness until you’re at the lightest resistance.
Once you’re doing 8 reps with a light band, it’s time to take off the “training wheels” and do pull ups for real.
The 8 to 12 rep range is a suggestion and a rep range that’s supported by research for adaptive stress.
If you’re overweight, your work will be in the kitchen, reducing the excess poundage you’d need to perform a pull up. Gym work is still required though, and the same progression for working into that first pull up applies.
Pull ups are a compound movement. Arm and back muscles must work together to make the exercise possible.
The shoulder gets involved too.
The shoulder blades must rotate inferiorly and medially (down and toward the midline) and the elbows must travel in more or less a line perpendicular to the floor.
Fun fact: for every 1° of scapula (shoulder blade) abduction, the humerus (upper arm) moves 2°. It’s a 1:2 ratio, called scapulo-humeral rhythm.
Learning the proper form lets you get the most out of the pull up, and avoid overuse injury.