The best online fitness resource you'll ever need. We filter out the BS to ensure you meet your health and fitness goals!
The best online fitness resource you'll ever need. We filter out the BS to ensure you meet your health and fitness goals!


When selecting exercises for developing an enviable set of quads, the sissy squat is tough to beat. Mathematically-speaking, sissies create more overload than any other exercise, despite tradition and gym lore.
Training for competition in powerlifting or weightlifting of course requires traditional squats and front squats, although muscle size gain sissies provide might contribute to strength gains, assuming added size leads to greater strength.
Sissy squats involve learning the technique, and, they require healthy knees to properly perform without risk.
A physique athlete could do nothing but sissy squats for quads, as some champion bodybuilders have actually done. However, many people like variety and believe it’s important.
Here are 10 sissy squat alternatives you can try if you’re looking for a little variety, or if sissies aren’t possible for you right now. We’ve ranked them in descending order by how biomechanically similar they are to the freeform sissy squat.
AAU Mr. Universe Doug Brignole does this sissy squat variation routinely. It makes tons of sense as a go-to quad exercise.
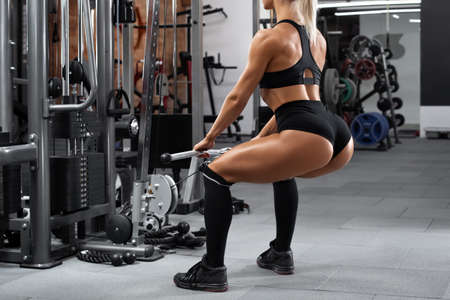
The cable sissy and its cousin, the cable squat (explained below), provide all the biomechanical benefit of the freeform sissy squat, but add built-in stability and resistance at the same time with almost zero spinal loads, making them a perfect exercise for lifters currently battling back injuries or rehabbing from injury or surgery.
To perform a cable sissy squat, you’ll need a cable pulley machine with a decent amount of iron available on the stack, and a handle or handles that let you hold your hands out to the sides of your legs.
Dual-axis cable machines work great for this because their arms can be adjusted to a width that’s comfortable. If you’re using a dual-axis cable machine, set the arms shoulder-width apart.
Single upright pulley machines work fine too if that’s what you have available.
Your lower legs (tibia) should remain perpendicular to the floor and your hips should get as near your calves as possible. The cable should bisect your lower legs about midway up your shins.
Sounds complicated but it’s not. The key is to discipline yourself to keep your torso from coming upright, or leaning forward over your legs. By leaning back, you’re forcing your quads to fight the cable machine the entire time.
One interesting note: a lighter weight seems to compensate for bodyweight on the descent (but not the ascent). So, you’ll need to select a weight that makes you work both descending and ascending.
Cable sissies can become your go-to as one of the sissy squat alternatives. Warm-up light for high reps, and then drop the weight until you’re doing a couple of challenging sets of six to eight. Cable sissies are also terrific as a superset with cable squats. See below.
Like the sissy squat, the leg extension has gotten a bad rap as harmful to the knees. Detractors cite shearing force between the femoral and tibial heads.
The direction of force and the structure of the knee make this impossible. Even so, leg extensions have been an exercise of choice for post-injury knee rehab.
Leg extensions depend on a well-designed leg extension machine, and unfortunately, there are very few good ones in captivity. A really good leg extension machine lets each leg work independently, with the motion being slight to the side to allow for the knee to extend along its natural path.
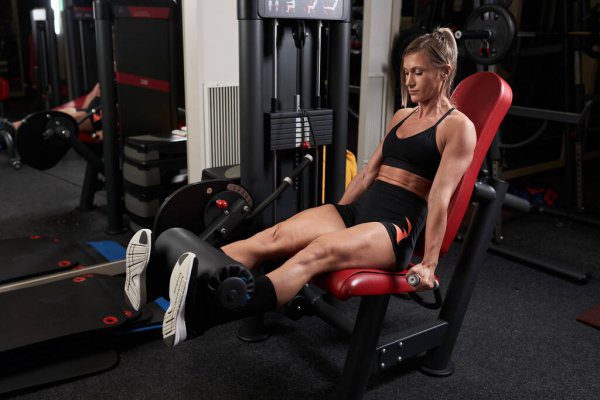
Leg extensions need no explanation, right?
Wrong.
The machine pretty much takes care of form—which is why finding a well-designed leg extension machine is key—but the trick is in how to position the seat and pads.
To optimize the leg extension:
Two myths:
An interesting variation on the leg extension is the reverse leg extension. Load the weight stack to a load greater than your body weight, and use the foot pads as anchors. This turns the leg extension machine into a sissy squat bench. Obviously, some lifters will outweigh the machine’s weight stack, making this a non-starter for them.
The Reverse Nordic Raise—or Reverse Nordic Hamstring Curl—takes a hamstring exercise that gained popularity during COVID-19 lockdown and flips it, literally.
To do the Reverse Nordic for quads you need to first know how to perform the Nordic curl.
From a two-leg kneeling position, hook your heels underneath something secure. During COVID lockdown, that would have been the box springs of your bed, or maybe a couch. Back at the gym, it might be a weighted barbell on the floor. Either way, your heels need to be anchored.
Then, with your torso perpendicular to the floor (straight above your knees), strongly your hamstrings and lower yourself toward the floor and raise back up again using your hams. To say it’s challenging a challenging exercise is like saying a tidal wave is moist.
The Reverse Nordic also starts from the kneeling position but without the heels hooked under anything, similar to the Kneeling Squat.
To do a reverse Nordic:
Hold a weight to your chest or wear a vest for extra resistance if needed. Reverse Nordics are extremely difficult to perform with anything other than bodyweight.
Some people’s ankles are less mobile than others, making the move not only difficult but extremely uncomfortable on the feet and ankles. Play around with foot placement, shoes on or shoes off, to find a foot positioning that keeps you focused on your quads and not your feet and ankles.
A cautionary note about this exercise: Unlike the sissy squat, your knees and lower legs are pinned to the floor and immobile. The freeform sissy squat allows for the knees to move freely in space. The reverse Nordic does not.
Do not attempt it if you’re dealing with a knee injury or have a history of knee problems. Make sure your knees are warmed up very well beforehand and use a nearby stability ball or bench to spot yourself until you get used to the exercise.
Cable squats are cable sissy squats but with the torso perpendicular over the hips. The hips move in a more up-and-down path, and not as much in and out. You’ll feel more glute and hamstring involvement than with the sissy version.
Use the same setup as for the cable sissy squat.
Supersets combining cable squats and cable sissy squats will absolutely gas your legs. Start with 15 of one followed immediately by 15 of the other, then raise the weight until you’re down to 10 and 10. Bring crutches and leave your ego at the door.
For fun and surprisingly challenging variation on the cable squat, substitute elastic tubing for the pulley machine.
Sometimes referred to as a band-assisted sissy squat, the Spanish squat challenges the quads, but not to the same degree as does the straight-up sissy squat. Pristine form for the Spanish squat has the torso positioned perpendicular to the floor throughout the movement, which gets the glutes and adductors involved, regardless of how deep you go.
A benefit of the Spanish squat is that it can be done almost anywhere and bodyweight is all most lifters need to get the training effect.
Select a strong resistance band. The thicker the better. The band is only to provide stability and it shouldn’t be so strong that it pulls you forward.
Doing these without leaning forward is a lot harder than you might think. Once you’ve mastered the move, grab a plate and hold it to your chest, wear a weighted vest or Bulgarian bag, or hold a couple of dumbbells to your sides for extra resistance. The pump is the goal. You’re not trying to set a weightlifting record here.
Spanish squats make a great finisher for leg day when using high reps (20-30 range), but you can use them as the main act as well.
As its name suggests, this is almost a freeform sissy squat with the support of elastic tubing with handles. The tubing serves the same purpose as the rack or bench you might hold onto during a freeform sissy, but with the tubing-assisted version, you can adjust the tension you want as support.
Using lighter tubing forces your legs to work harder since the tubing won’t keep you from flopping over backward and embarrassing yourself. It supports, but like a very light spot on a bench press, but should only enough to keep you on track.
Selecting a heavier gauge tubing adds a bit more support.
Do your best to resist pulling yourself up, letting your quads control both the eccentric and concentric contraction. Again, think of the tubing as a spotter.
Tubing-assisted sissies will force your quads to “stay in the game” during that mid-point as you come out of the pocket, since the support is much less rigid, and the lighter the tubing gauge, the more this is true.
The sissy squat bench removes the challenge of the freeform sissy squat and lets you concentrate on the quads alone. When you think about it, the bench turns the sissy squat into a reverse leg extension: instead of the movement being from the knee down, it’s from the knees up.
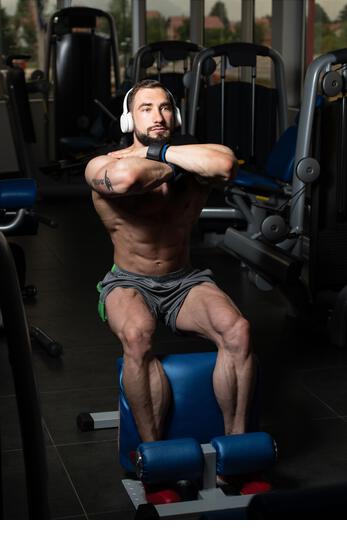
Although it will appear that the glutes are seeing action, they’re not…at least not very much. The hip joint is moving passively. If you feel the glutes getting involved (which you likely will not, just lean back slightly).
The sissy bench adds rotational force to the sissy squat, which is a big reason why it’s such a terrific substitute for the regular sissy squat.
As with the Reverse Nordic, remember that your lower legs are pinned, so make sure you’re good and warmed up before doing the seated sissy.
If your gym doesn’t have a sissy squat bench (and many do not), you can create a functional equivalent using a Smith machine or power rack.
Position the bar behind your legs so that it’s directly in the crook of the knee. No weights are required with a Smith machine, but with a power rack you’ll want to load the bar with enough weight to secure it, and position it against either the front or back verticals to keep the bar from rolling.
Have your training partner hold your feet and perform the same movement you would on the dedicated sissy squat bench.
The Hindu squat is a centuries-old exercise used by wrestlers in India. Biomechanically, it’s very similar to the sissy squat. The heels come off the ground and the femur and tibia end up in very close approximation. There’s almost no glute and ham involvement.
The difference lies in the position of the torso and consequently, the amount of load that the quads bear. Because there’s no backward lean with the Hindu squat, the lever arm is shortened, lightening the load. This doesn’t mean they’re easy.
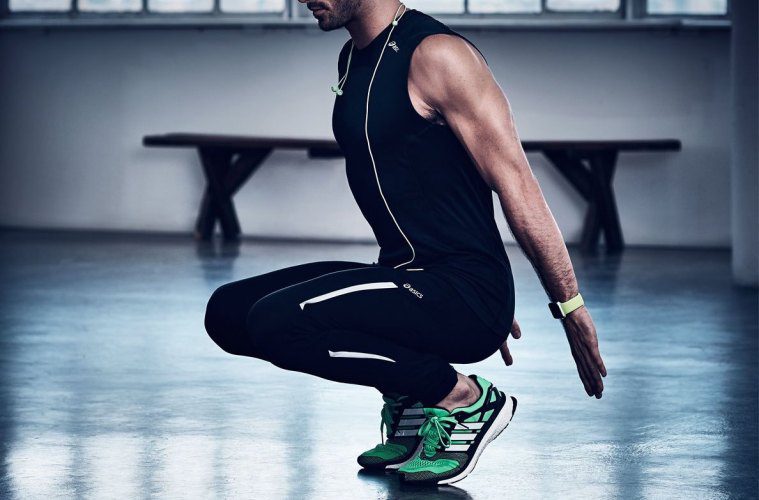
Hindu squats are a great way to transition to sissy squats since they remove the added challenge of keeping the torso in line with the thighs.
The hack squat variant of the sissy squat alternatives is a beast and comes with some risk because the shoulders and the feet are fixed and only the knees flex and extend. The great Tom Platz was renowned for using sissy squat foot placement on a hack squat machine.
For the newcomer to sissy squats, the heel-elevated squat may be the best place to start. You’ll get the feel of pressing with the forward half of your foot, and begin to wean yourself off the need to lean forward to maintain uprightness.
The exercise is essentially a Hindu squat with heels supported by a block, barbell plates, aerobics step…whatever is handy to get your heels a couple of inches off the ground. You’ll want to use enough height to mimic the distance your heels come off the floor during a sissy squat, so look for a thicker plate or step to rest your heels on.
You can use dumbbells held at your sides, or goblet style, hold a weight plate to your chest or wear a weighted vest to add resistance.
After a few reps, you should find that your quads will begin to burn, especially in the vastus medialis, aka the teardrop.
Work up to high-rep sets to learn the movement, and once you’ve mastered it, you’ll probably be ready to give sissies a go for real.
Mastering the sissy squat is completely worth the time and energy.
So whether you’re working your way into doing strict sissy squats, looking to add some variety to your routine, or just wanting to try something new, any of the 10 sissy squat alternatives will make a fun diversion to your leg day.